Welcome back!
In this blog we will continue discussing the benefits of fully understanding classical conditioning and operant conditioning. If you haven’t already, head to my previous blog and read most recent about classical conditioning! This blog will be focused on operant conditioning. Let’s get into it.
As previously stated, these two theories apply to both humans and dogs (and other mammals). The simple definition of operant conditioning is that the subject learns that their actions control the outcomes. The example that is notoriously given is the one in which explaining how a child will learn not to touch a hot stove after getting burned from said stove. While this is a true example, there’s much more to it. Operant conditioning is when a dog learns which behaviors will earn him a punishment and which will earn him a reward therefore he can determine the consequence. Dogs, like most other living things, want to be safe and comfortable. They will naturally seek out such outcomes that satisfy those basic desires. It’s up to us as humans to learn how to manipulate that in order to produce better habits from our dogs.
If you peek at the photo below, you’ll see a visual reference guide to operant conditioning. Looks simple, doesn’t it? Well guess what, IT IS. The problem is being able to recognize it in everyday life and training sessions.
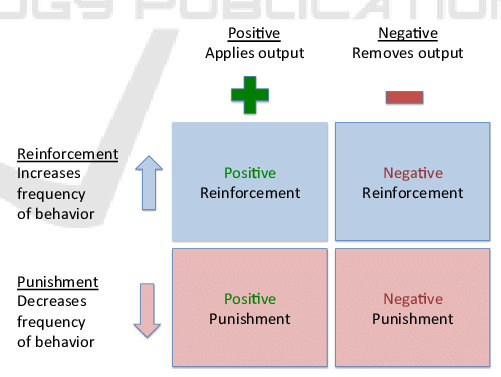
Before we dive in, I want you to change the way you translate some terms:
When you read “positive” instead of thinking “good”, think TO GIVE.
When you read “negative” instead of thinking “bad”, think TO TAKE AWAY.
When you read “punishment”, think DECRESING BEHAVIOR.
When you read “reinforcement”, think INCREASING BEHAVIOR.
Let’s break down each quadrant.
Positive Punishment (PP):
Translates to “to give to decrease behavior”. PP means to apply a correction when your does something you do not like. When done properly, being able to physically tell your dog that what they just did is wrong will wildly improve the communication between the two of you. Dogs are not bad; they’re just confused on what you want because the language gap is never closed. When implementing PP, you are creating a clear signal of “no”. The most common tool for using PP is a pinch collar or e-collar. But if you really explore PP, you will find there are a ton of ways to implement PP that can produce success. The key is to learn your dog and figure out what is considering punishing to them.
Positive Reinforcement (PR):
Translates to “to give to increase behavior”. This one is simple and implemented by anyone who has ever slightly dabbled in training. This means to give your pup a reward for a behavior that you like. Your dog sat and you gave them a biscuit? You’ve accomplished positive reinforcement! The fun part to remember, though, is that a reward can look like many different things to a dog. Rewards can be activities, physical touch, some time to sniff on their walk, a car ride, etc. Learn what your dog truly enjoys and use that to inspire better behaviors.
Negative Punishment (NP):
Translates to “to take away to decrease behavior”. This one sounds trickier than it is. Negative punishment means to take away whatever stimulus that is causing the negative behavior in your dog. An easy example with this one is when your dog is pulling on the leash. The stimulus for the dog is being outside and wanting to continue the walking, sniffing, and peeing. But being on the other end of the leash, we don’t want a dog that pulls. So, we take away the stimulus of walking to punish the behavior of pulling. This doesn’t always mean loading your dog back up and treading home. It can simply mean only moving when your dog isn’t pulling. With proper sessions and implementation, this is a great technique for leash pullers!
Negative Reinforcement (NR):
Translates to “to take away to increase behavior”. With this one, think of it as removing some sort of pressure once the dog completes a desired behavior. Keep in mind, this is different from positive punishment. With PP, the correction comes after the behavior. With NR, the “pressure” already exists and is removed once the behavior is completed. When teaching the place command, you can use a slip lead (or just normal collar and leash) to guide the dog to the place mat. When guiding you are applying minimal pressure to the lead. Once the dog is on the place mat, the pressure is immediately released. For best result, this should be paired with a treat, as well!
If you prefer videos, I have a one uploaded to my Youtube explaining operant conditioning!
Remember, anything is paw-sible.
Stay informed on the latest information.